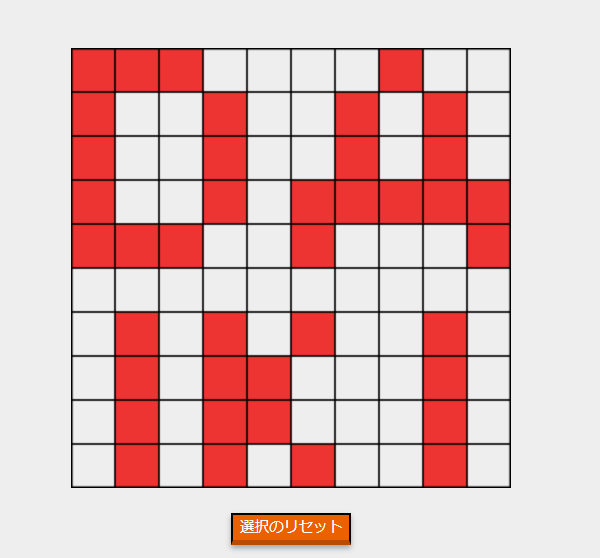
フィールド(マス目状)を作ってみました。
キャンバス上をクリックするとその位置マス目の色塗ることができます。
タクティクスゲームやマス目を使ったゲームに利用できそうです。
デモはこちらです。
index.html
<!DOCTYPE html>
<html lang="ja" dir="ltr">
    <head>
        <meta charset="utf-8">
        <meta name="viewport" content="width=device-width, initial-scale=1.0">
        <link rel="stylesheet" href="../style.css">
        <title>フィールドを作ってみる</title>
        <script src="Field.js"></script>
        <script src="main.js"></script>
    </head>
    <body>
        <div class="wrap">
            <canvas id="canvas"></canvas><br>
            <button id="reset">選択のリセット</button>
        </div>
    </body>
</html>
フロント画面です。
キャンバスとボタンを描画しています。
main.js
window.onload = () => {
    const canvas = document.getElementById('canvas');
    // キャンバスの最大サイズは (400, 400) にする
    const MAX_WIDTH = 400;
    let canvasSize = document.documentElement.clientWidth;
    // キャンバスのサイズを設定する
    if(MAX_WIDTH <= canvasSize) canvasSize = MAX_WIDTH;
    canvas.width = canvasSize;
    canvas.height = canvasSize;
    const ctx = canvas.getContext('2d');
    // フィールド描画するクラス
    const Field = new FieldClass();
    Field.setSize(canvas.width, canvas.height);
    Field.drawField(ctx);
    // キャンバス上でマウスが移動したときに呼ばれる
    canvas.addEventListener('mousemove', e => {
        Field.fillSelectField(ctx, {x: e.offsetX, y: e.offsetY});
    });
    // キャンバス上でクリックされたら呼ばれる
    canvas.addEventListener('click', e => {
        Field.clickCell({x: e.offsetX, y: e.offsetY});
    });
    // キャンバス内からキャンバス外へマウスが移動したときに呼ばれる
    canvas.addEventListener('mouseleave', Field.redrawField.bind(Field, ctx));

    // リセットボタンに処理を追加する
    document.getElementById('reset').addEventListener('click', Field.resetSelectedFill.bind(Field, ctx));
}
読み込みが完了した時の処理です。
処理の流れは以下です。
graph TD;
A(フロント画面からキャンバスの取得<br>キャンバスサイズ設定)-->B;
B(フィールドクラスの初期化)-->C;
C(マウスリスナーの追加)-->D;
D(リセットボタンのリスナーの追加);
フィールドクラスでキャンバスに描画処理をしているので、キャンバスのコンテキストを渡しています。
Field.js
class FieldClass {
    constructor() {
        this.MAX_LINE = 10;
        this.width;
        this.height;
        this.selectedFill = [];
    }

    // フィールドのサイズ
    setSize(w, h) {
        this.width = w;
        this.height = h;
    }

    // フィールドを描画する
    drawField(ctx) {
        // canvas を MAX_LINE 等分する
        ctx.strokeStyle = '#000000';
        ctx.lineWidth = 3;
        let i = 0;
        // 升目を描画する
        for(i = 0; i < this.MAX_LINE; i ++) {
            if(0 < i) ctx.lineWidth = 1.5;
            // 横方向に線を引く
            ctx.beginPath();
            ctx.moveTo(0, this.height / this.MAX_LINE * i);
            ctx.lineTo(this.width, this.height / this.MAX_LINE * i);
            ctx.stroke();
            // 縦方向に線を引く
            ctx.beginPath();
            ctx.moveTo(this.width / this.MAX_LINE * i, 0);
            ctx.lineTo(this.width / this.MAX_LINE * i, this.height);
            ctx.stroke();
        }
        // 一番下と一番右の線を描画する
        ctx.lineWidth = 3;
        ctx.beginPath();
        ctx.moveTo(0, this.height / this.MAX_LINE * i);
        ctx.lineTo(this.width, this.height / this.MAX_LINE * i);
        ctx.stroke();
        ctx.beginPath();
        ctx.moveTo(this.width / this.MAX_LINE * i, 0);
        ctx.lineTo(this.width / this.MAX_LINE * i, this.height);
        ctx.stroke();
    }

    // マウスの位置を塗る
    fillSelectField(ctx, pos) {
        if(pos.x < 0 || pos.y < 0) return;
        ctx.clearRect(0, 0, this.width, this.height);
        const index = {x: Math.floor(pos.x / (this.width / this.MAX_LINE)), y: Math.floor(pos.y / (this.width / this.MAX_LINE))};
        ctx.fillStyle = '#ee3333';
        ctx.fillRect(this.width / this.MAX_LINE * index.x, this.height / this.MAX_LINE * index.y, this.width / this.MAX_LINE, this.height / this.MAX_LINE);
        for(let i = 0; i < this.selectedFill.length; i ++) {
            ctx.fillRect(this.width / this.MAX_LINE * this.selectedFill[i].x, this.width / this.MAX_LINE * this.selectedFill[i].y, this.width / this.MAX_LINE, this.height / this.MAX_LINE);
        }
        this.drawField(ctx);
    }

    // マウスがキャンバス外に移動したらフィールドを再描画する
    redrawField(ctx) {
        ctx.clearRect(0, 0, this.width, this.height);
        for(let i = 0; i < this.selectedFill.length; i ++) {
            ctx.fillRect(this.width / this.MAX_LINE * this.selectedFill[i].x, this.width / this.MAX_LINE * this.selectedFill[i].y, this.width / this.MAX_LINE, this.height / this.MAX_LINE);
        }
        this.drawField(ctx);
    }

    // クリックした位置を保存する
    clickCell(pos) {
        this.selectedFill.push({x: Math.floor(pos.x / (this.width / this.MAX_LINE)), y: Math.floor(pos.y / (this.width / this.MAX_LINE))});
    }

    // 選択したフィルをリセットする
    resetSelectedFill(ctx) {
        this.selectedFill = [];
        ctx.clearRect(0, 0, this.width, this.height);
        this.drawField(ctx);
    }
}
スクリプト内のコメントにある通りです。
MAX_LINE の値を変更することで、フィールドのサイズを変更できます。
はまりそうなところ
16行目からフィールドを描画する関数がありますが、キャンバスの仕様上、
線の太さを1、(0, 0)地点からキャンバスの幅分の線を引くと、線の半分しか描画されません。
試してみると分かりますが、上下左右の線の色が薄く見えます。
解決策として、始点と終点をキャンバスの内側にするか、線の太さで調整するか、です。
今回は線の太さで調整してみました。
マウスの位置を塗る
48行目から、マウスポインタの位置にあるマス目に色を塗っています。
マウスの座標は画面上の浮動小数点値で取得できるので、Math.floor() を使って小数点以下を切り捨てています。
なので、線上では線の左側、もしくは線の上側の色が塗られます。
マウスベントの仕様はこちら。
クリックした位置を塗る
クリックした位置を配列で保持し、マウスが移動するたびに再描画しています。
おそらくもっと効率的なやり方があるかと思いますが、今回は配列をループしてみました。
