座標
canvasの座標について調べてみましょう。
window.onload = () => {
	const w = 500;
	const h = 500;
	// Canvas の章で作成した Canvas.js
	const Canvas = new CanvasClass();
	Canvas.setCanvasSize(w, h);
	const ctx = Canvas.getContext();
	ctx.fillStyle = 'rgb(191, 255, 191)';
	ctx.fillRect(0, 0, w, h);
	ctx.fillStyle = 'rgb(0, 0, 0)';
	ctx.beginPath();
	// (0, 0) に半径50の円を描く
	ctx.arc(0, 0, 50, calcRadian(0), calcRadian(360));
	ctx.stroke();
	ctx.beginPath();
	// (250, 250) に半径50の円を描く
	ctx.arc(250, 250, 50, calcRadian(0), calcRadian(360), true);
	ctx.stroke();
	ctx.beginPath();
	// (500, 500) に半径50の円を描く
	ctx.arc(500, 500, 50, calcRadian(0), calcRadian(360), false);
	ctx.fill();

	// degree(度数法)をradian(弧度法)に変換して返す
	function calcRadian(deg) {
		return deg * Math.PI / 180;
	}
}使用しているCanvasClass.jsはこちらにあります。
実行結果
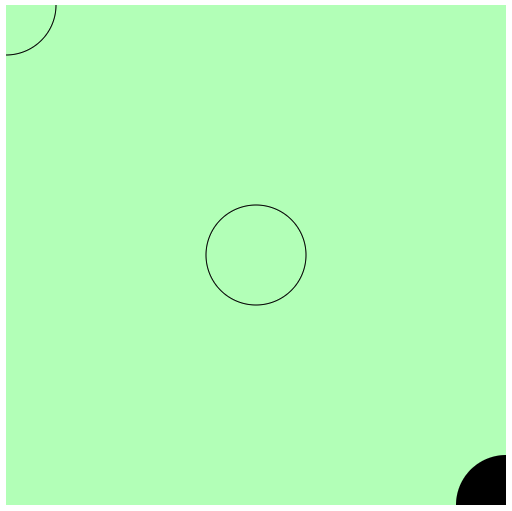
左上、中央、右下の三箇所に円を描きました。
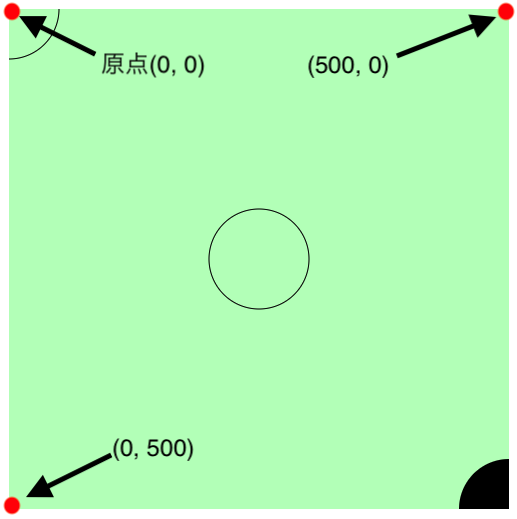
JavaScriptのcanvasの座標はこのようになっています。
言語やフレームワーク、ゲームエンジンによっては左下になったりもします。
テキストの座標
さきほどのaxis.jsにテキストの描画処理を追記します。
	// テキストを描画してみる
	ctx.font = '16px serif';
	ctx.fillStyle = 'rgb(250, 0, 100)';
	ctx.fillText('(0, 50)に描画中', 0, 50);
	ctx.fillText('(250, 200)に描画中', 250, 200);
	ctx.fillText('(350, 450)に描画中', 350, 450);
実行結果
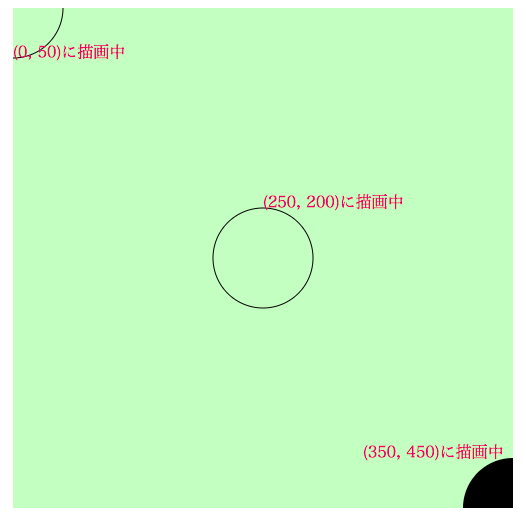
テキストを描画しました。
描画座標はテキストの通りです。
テキストを描画する際、テキストの座標の始点になるのは左下になります。
座標を決める点(テキストなら左下)のことをアンカーと呼びます。
言語やフレームワーク、ゲームエンジンによってはアンカーを自分で設定することができるものもあります。
ボールを動かしてみる
さて、このアンカー、なぜ必要になるのかを試してみます。
自分で作成しながら読み進める場合には、次にどのような作業をするのかを書きますので、読み進める前に自分で実装してみましょう。
何はともあれ、ボールクラスを作ります。
class BallClass {
	// canvas の context をコンストラクターの引数に渡す
	constructor(x) {
		this.ctx = x;
		this.posX = 50;
		this.posY = 15;
		this.radius = 15;
		this.drawStartDig = this.calcRadian(0);
		this.drawEndDig = this.calcRadian(360);
		this.ctx.fillStyle = 'rgb(0, 0, 0)';
	}

	// ボールの描画
	drawBall() {
		this.ctx.beginPath();
		this.ctx.arc(this.posX, this.posY, this.radius, this.drawStartDig, this.drawEndDig);
		this.ctx.stroke();
	}

	// degree(度数法)をradian(弧度法)に変換して返す
	calcRadian(deg) {
		return deg * Math.PI / 180;
	}
}
window.onload = () => {
const w = 500;
const h = 500;
// Canvas の章で作成した Canvas.js
const Canvas = new CanvasClass();
Canvas.setCanvasSize(w, h);
const ctx = Canvas.getContext();
ctx.fillStyle = 'rgb(191, 255, 191)';
ctx.fillRect(0, 0, w, h);
const Ball = new BallClass(ctx);
Ball.drawBall();
}実行結果
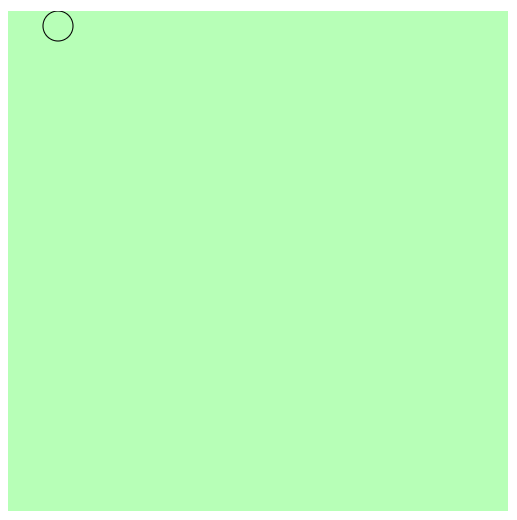
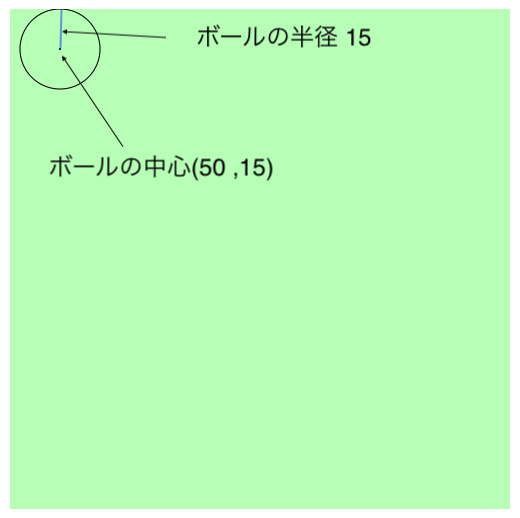
座標(50, 15)、半径15のボールが描画されます。
CanvasClassとBallClassとを利用しました。
次はボールを下方向に動かしてみましょう。
下方向はcanvasでいうと y軸の + 方向です。
まずは、BallClassを修正します。
class BallClass {
	// canvas の context をコンストラクターの引数に渡す
	constructor(x) {
		this.ctx = x;
		this.posX = 50;
		this.posY = 15;
		this.moveSpeed = 5;
		this.radius = 15;
		this.drawStartDig = this.calcRadian(0);
		this.drawEndDig = this.calcRadian(360);
		// this.ctx.fillStyle = 'rgb(0, 0, 0)';
	}

	// ボールの描画
	drawBall() {
		this.ctx.fillStyle = 'rgb(0, 0, 0)';
		this.ctx.beginPath();
		this.ctx.arc(this.posX, this.posY, this.radius, this.drawStartDig, this.drawEndDig);
		this.ctx.stroke();
	}

	// ボールを動かす
	moveBall() {
		this.posY += this.moveSpeed;
	}

	// degree(度数法)をradian(弧度法)に変換して返す
	calcRadian(deg) {
		return deg * Math.PI / 180;
	}
}
続いて、moveBallを修正します。
window.onload = () => {
	const w = 500;
	const h = 500;
	// Canvas の章で作成した Canvas.js
	const Canvas = new CanvasClass();
	Canvas.setCanvasSize(w, h);
	const ctx = Canvas.getContext();
	// - ctx.fillStyle = 'rgb(191, 255, 191)';
	// - ctx.fillRect(0, 0, w, h);
	const Ball = new BallClass(ctx);
	// - Ball.drawBall();
	// 周期関数の実装
	// setInterval(関数, ミリ秒単位の実行間隔)
	// setInterval(func, delay)
	// 100ms毎にcanvasに色を塗り、ボールを描画する
	setInterval(function() {
		ctx.fillStyle = 'rgb(191, 255, 191)';
		ctx.fillRect(0, 0, w, h);
		Ball.moveBall();
		Ball.drawBall();
	}, 100);
}
修正した箇所をハイライトしています。
実行結果はこうなります。
setInterval()についてはこちらの章で説明しています。
ボールが下方向に移動していきます。
ボールを反射させてみる
しかし、下方向に行きっぱなしでは面白くないので、canvasの下部にいったら上方向へ動かしてみましょう。
また、canvasの上部にいったら下方向へ動かす処理を作成します。
BallClassを修正します。
class BallClass {
	// canvas の context をコンストラクターの引数に渡す
	constructor(x) {
		this.ctx = x;
		this.posX = 50;
		this.posY = 15;
		this.moveSpeed = 5;
		this.radius = 15;
		this.drawStartDig = this.calcRadian(0);
		this.drawEndDig = this.calcRadian(360);
	}

	// ボールの描画
	drawBall() {
		this.ctx.fillStyle = 'rgb(0, 0, 0)';
		this.ctx.beginPath();
		this.ctx.arc(this.posX, this.posY, this.radius, this.drawStartDig, this.drawEndDig);
		this.ctx.stroke();
	}

	// ボールを動かす
	moveBall() {
		this.posY += this.moveSpeed;
		if(this.posY >= this.ctx.canvas.height || this.posY <= 0) this.moveSpeed *= -1;
	}

	// degree(度数法)をradian(弧度法)に変換して返す
	calcRadian(deg) {
		return deg * Math.PI / 180;
	}
}
実行結果
ボールが上下に移動するようになりました。
処理の内容としては、ボールの座標がcanvasよりも下部、もしくは上部に行った場合、ボールの速さに-1を乗算しています。
さて、私は一つ気になることがあります。
それは、ボールが方向転換する際に、画面外にボールが飛び出してしまうことです。
ということで、ボールが画面外に出る前に、方向転換させてみます。
相も変わらずBallClassを修正します。
class BallClass {
	// canvas の context をコンストラクターの引数に渡す
	constructor(x) {
		this.ctx = x;
		this.posX = 50;
		this.posY = 15;
		this.moveSpeed = 5;
		this.radius = 15;
		this.drawStartDig = this.calcRadian(0);
		this.drawEndDig = this.calcRadian(360);
	}

	// ボールの描画
	drawBall() {
		this.ctx.fillStyle = 'rgb(0, 0, 0)';
		this.ctx.beginPath();
		this.ctx.arc(this.posX, this.posY, this.radius, this.drawStartDig, this.drawEndDig);
		this.ctx.stroke();
	}

	// ボールを動かす
	moveBall() {
		this.posY += this.moveSpeed;
		if(this.posY + this.radius >= this.ctx.canvas.height || this.posY - this.radius <= 0) this.moveSpeed *= -1;
	}

	// degree(度数法)をradian(弧度法)に変換して返す
	calcRadian(deg) {
		return deg * Math.PI / 180;
	}
}
修正したのはBallClass.jsの24行目のみです。
方向転換をする条件にをボールのy座標に、ボールの半径を加算・減算しています。
図にしてみると整理しやすくなります。
ボールはcontext.arc()という関数を利用して描いています。
この関数は、中心と半径(r)を利用しています。
つまり、中心からボールの上部までの長さはrということにります。
なので、ボールの上部の座標は、ボールのy座標にボールの半径を減算すれば求まります。
ボールの下部の座標は、ボールのy座標にボールの半径を加算すれば求まります。
最後に
座標とアンカーについて説明してみました。
座標の中心やアンカーはゲームにおいて重要になります。
様々なオブジェクト(画像やテキスト・図形など)の基準点となるので、操作する際に必要になるからです。
最後に、ボールが左右上下に動き回るものを実装したものをおいておきます。
class BallClass {
	// canvas の context をコンストラクターの引数に渡す
	constructor(x) {
		this.ctx = x;
		this.posX = 50;
		this.posY = 15;
		this.moveSpeedY = 5;
		this.moveSpeedX = 10;
		this.radius = 15;
		this.drawStartDig = this.calcRadian(0);
		this.drawEndDig = this.calcRadian(360);
	}

	// ボールの描画
	drawBall() {
		this.ctx.fillStyle = 'rgb(0, 0, 0)';
		this.ctx.beginPath();
		this.ctx.arc(this.posX, this.posY, this.radius, this.drawStartDig, this.drawEndDig);
		this.ctx.stroke();
	}

	// ボールを動かす
	moveBall() {
		this.posY += this.moveSpeedY;
		this.posX += this.moveSpeedX;
		if(this.posY + this.radius >= this.ctx.canvas.height || this.posY - this.radius <= 0) this.moveSpeedY *= -1;
		if(this.posX + this.radius >= this.ctx.canvas.width || this.posX - this.radius <= 0) this.moveSpeedX *= -1;
	}

	// degree(度数法)をradian(弧度法)に変換して返す
	calcRadian(deg) {
		return deg * Math.PI / 180;
	}
}
window.onload = () => {
const w = 500;
const h = 500;
// Canvas の章で作成した Canvas.js
const Canvas = new CanvasClass();
Canvas.setCanvasSize(w, h);
const ctx = Canvas.getContext();
const Ball = new BallClass(ctx);
// 周期関数の実装
// setInterval(関数, ミリ秒単位の実行間隔)
// setInterval(func, delay)
// 100ms毎にcanvasに色を塗り、ボールを描画する
setInterval(function() {
ctx.fillStyle = 'rgb(191, 255, 191)';
ctx.fillRect(0, 0, w, h);
Ball.moveBall();
Ball.drawBall();
}, 100);
}
